Erste Inbetriebnahme

-
Stelos 800 L
Stelos: Sicherheitshinweise – vor Gebrauch lesen | Umwelt Stelos: Firmware Update Stelos: Benutzeroberfläche | Anzeigen | Funktionen | Handhabung Stelos: Technische Daten Stelos: Fernbedienung | Blitzauslösung Stelos: Stromversorgung| Akku Stelos: Wartung | Reparatur | Garantie Stelos: Zubehör und Ersatzteile Stelos: Fehlermeldungen
-
Satos
Satos: Sicherheitshinweise – vor Gebrauch lesen | Umwelt Satos: Firmware Update Satos: Benutzeroberfläche | Anzeigen | Funktionen | Handhabung Satos: Technische Daten Satos: Fernbedienung | Blitzauslösung Satos: Stromversorgung | Batterie Satos: Wartung | Reparatur | Verbrauchsmaterial | Ersatzteile | Garantie Satos: Zubehör und Kompatibilität Satos: Ladestation für bis zu 4 Einschubakkus
- Pulso L
-
Siros S
Siros S: Sicherheitshinweise – vor Gebrauch lesen | Umwelt Siros S: Firmware update Siros S: Benutzeroberfläche | Anzeigen | Funktionen | Handhabung Siros S: Technische Daten Siros S: Fernbedienung | Blitzauslösung Siros S: Stromversorgung Siros S: Wartung | Reparatur | Verbrauchsmaterial | Ersatzteile | Garantie Siros S: Zubehör
-
Siros L
Siros L: Sicherheitshinweise – vor Gebrauch lesen | Umwelt Siros L: Firmware Update Siros L Siros L: Benutzeroberfläche | Anzeigen | Funktionen | Handhabung Siros L: Technische Daten Siros L: Fernbedienung | Blitzauslösung Siros L: Stromversorgung | Batterie Siros L: Wartung | Reparatur | Verbrauchsmaterial | Ersatzteile Siros L: Zubehör
- Scoro E + S
- Move 1200 L
- RFS 2.2
- RFS 2.1
-
RFS 3
RFS 3: Sicherheitshinweise – vor Gebrauch lesen | Umwelt RFS 3: Lieferumfang und Bedienelemente RFS 3: Benutzeroberfläche | Anzeigen | Funktionen | Handhabung RFS 3: Technische Daten RFS 3: Firmware Update RFS 3: Kompatibilität RFS 3: Fehlersuche RFS 3: Wartung | Reparatur | Verbrauchsmaterialien | Ersatzteile | Garantie
- Pulso G, Unilite und Picolite
- LED F160
- Scope D50
- Kompatibilität (Leuchte <-> Lichtformer | Leuchte <-> Generator)
- Finden Sie Ihren Distributor oder Händler
-
 Stelos 800 L
-
 Satos
Satos
-
 Pulso L
-
 Siros S
-
 Siros L
-
 Scoro E + S
-
 Move 1200 L
-
 RFS 2.2
-
 RFS 2.1
-
 RFS 3
RFS 3
-
 Pulso G, Unilite und Picolite
-
 LED F160
-
 Scope D50
-
Kompatibilität (Leuchte <-> Lichtformer | Leuchte <-> Generator)
-
Finden Sie Ihren Distributor oder Händler
Die mitgelieferten Sicherheitshinweise müssen zwingend beachtet werden!
Entfernen Sie sämtliche Transportschutzmaterialien sowie den schwarzen Schutzdeckel vom Schirmreflektor, bevor Sie die Leuchte einschalten.
Entfernen und Befestigen von Lichtformern
Die LED F160 Leuchte ist mit einem neuartigen Arretierschieber ausgestattet. Durch Fixieren in der hintersten Position hat man nun beide Hände frei, um den Lichtformer sicher und kontrolliert entfernen bzw. auswechseln zu können.
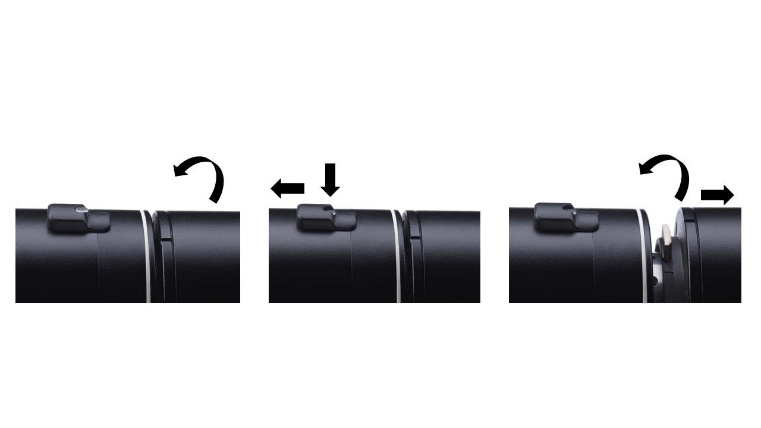
Um den Lichtformer zu entfernen, drehen Sie diesen in eine Richtung bis zum Anschlag. Ziehen Sie den Arretierschieber mit einem Finger bis zum Anschlag zurück und drücken Sie den kleinen Sicherungsstift in der hintersten Position nach unten. Der Schieber wird nun an dieser Stelle verharren. Drehen Sie den Lichtformer weiter in dieselbe Richtung, bis dieser entriegelt ist. Nun können Sie ihn vorsichtig herausnehmen. Bitte achten Sie darauf, den Diffusionsvorsatz nicht zu beschädigen oder zu ver¬kratzen.
Das Befestigen von Lichtformern ist ebenfalls ganz einfach:
Den Lichtformer von vorne an die LED F160 Leuchte heranführen, diesen an den Bajonettaussparungen (klein zu klein und gross zu gross) ausrichten, bis zum Anschlag nach hinten drücken und dann mit einer leichten Drehung nach links oder rechts das Verriegeln auslösen. Dabei hören Sie ein "Klicken". Der Lichtformer ist nun sicher befestigt.
Mntieren eines Schirms
Führen Sie, falls gewünscht, die Schirmstange in die Schirmhalterung ein, welche sich an der Stativaufnahme unterhalb der Leuchte befindet.
Verbinden Sie zuerst den Kabelschwanz der LED F160 Leuchte mit dem permanent am Netzteil befestigten Kabel.
Verbinden Sie nun das mitgelieferte Netzkabel mit dem Netzteil.
Stecken Sie anschliessend den Netzstecker in eine geeignete Steckdose.
Die Display-Beleuchtung ist nun aktiviert und die LED F160 Leuchte ist einsatzbereit.
Mit einem kurzen Druck auf die Ein-/Austaste ( ) leuchten die LEDs auf und können auf dieselbe Weise auch wieder ausge¬schaltet werden („Standby“).
Zum Ausschalten des Gerätes ziehen Sie bitte den Netzstecker aus der Steckdose. Das Display erlischt erst vollständig, sobald die Stromzufuhr unterbrochen wird. Der Netzstecker dient dazu das Gerät vom Strom zu trennen und sollte deshalb immer leicht zugänglich bleiben.
Falls gewünscht, montieren Sie die LED F Leuchte auf einem geeigneten Stativ. Die Stativaufnahme befindet sich an der Unter¬seite des Gerätes.

Warnung
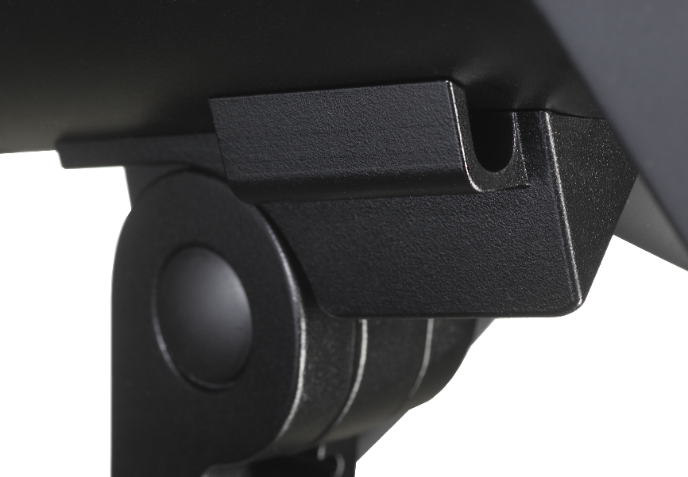
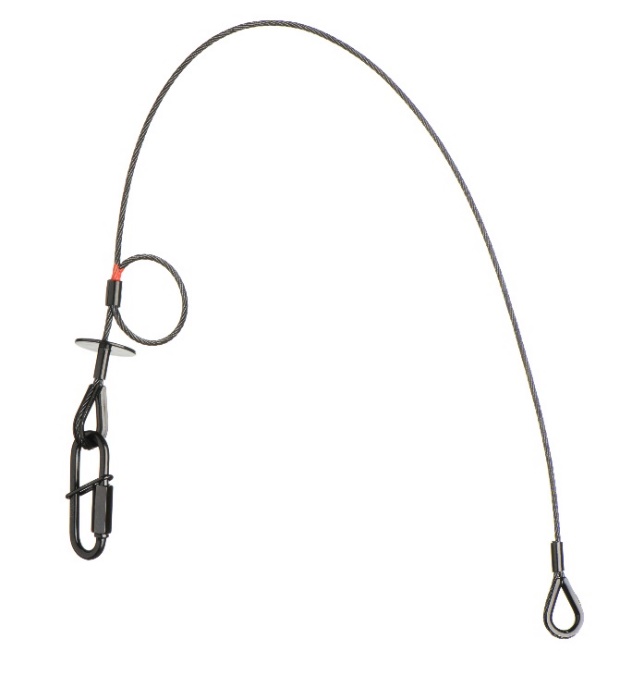
Beachten Sie zur Deckenmontage unbedingt die Montagevorschriften, welche mit dem separat erhältlichen Zubehör
„33.173.00 – Sicherungsseil zu LED F160 Leuchte“ mitgeliefert werden.
Die LED F160 Leuchte darf ohne das oben genannte Sicherungsseil NICHT an der Decke montiert werden!
The display of the LED F160 lamp has an automatic orientation. In overhead operation, the display automatically rotates by 180°.